Attenuation
What happened to that base power of 270?!
By definition, it means the gradual loss of flux intensity while traveling through a medium. In this case, it's gunfire traveling to the target, thus the further Aya is from the target, the less damage she does, though this does not apply to all weapons.
Parasite Eve II appears to have 5 sets of values, ranging from the furthest away (literally the 'edge' of your damage range) up to point-blank range, equivalent of how close you must get to use a melee attack. If only one attenuation is displayed, that value is consistent for the full range of the weapon. Handguns and automatic weapons are the main users of the variable range. Most shotguns benefit from a close-quarters damage bonus. Weapons with attachments or secondary attacks (Like the Gunblade's melee swing) are subject to the same attenuation.
Also, a weapon marked as 0.9 or 0.8 is not a perfect % damage reduction; most values have an additional minor fraction added on to the penalty.
Penalty chart:
1.2 = 1.0 + 0.2 - 1/640
1.0 = 1.0
0.9 = 1.0 - 0.1 - 1/640
0.8 = 1.0 - 0.2 - 1/320
0.7 = 1.0 - 0.3 - 1/1280
0.6 = 1.0 - 0.4 - 3/1280
0.5 = 0.5
0.4 = 0.5 - 0.1 - 1/640
0.3 = 0.5 - 0.2 - 1/320
A few examples of minimum damage (not counting the % bonus you get per shot):
Buckshot (Power: 40) w/ attenuation of 0.8 = 31 dmg.
5.56 Rifle (Power: 22) w/ attenuation of 0.7 = 15 dmg.
Grenade (Power: 270) w/ attenuation of 0.7 = 188 dmg.
Weapons List
| Name | Rates (Furthest to closest) | ||||
| P08, P08 S.Magazine, P229, Mongoose | 0.8 | 0.8 | 0.9 | 1.0 | 1.0 |
| M93R | 0.5 | 0.6 | 0.7 | 0.8 | 1.0 |
| M950, MP5A5 (Normal, +1 and +2) | 0.4 | 0.5 | 0.6 | 0.7 | 0.7 |
| PA3, SP12, AS12 | 0.8 | 0.8 | 0.8 | 1.2 | 1.2 |
| Gunblade | --- 0.8 --- | ||||
| Grenade Pistol, MM1 | --- 0.7 --- | ||||
| M4A1 Rifle (Normal, +1 and +2), M4A1 Bayonet, M4A1 Javelin | --- 0.7 --- | ||||
| M4A1 Hammer, M4A1 Grenade, M4A1 Pyke | --- 0.6 --- | ||||
| M249 | 0.3 | 0.4 | 0.5 | 0.6 | 0.6 |
| Tonfa Baton, Hypervelocity | --- 1.0 --- | ||||
Critical Rate
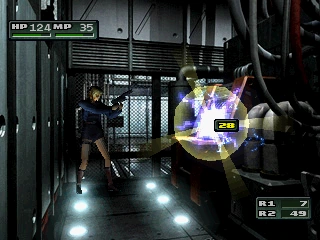
Aya hitting a target for critical damage.
Several weapons have a chance to inflict 4x their normal damage per shot. Barring a couple exceptions, most of these weapons are slower-firing guns that get more damage out of a bullet due to lower attenuation penalties. When a target is hit by a such an attack, a yellow flash appears around the target, signifying they took a critical hit.
Instead of a fixed percentage or exploiting a weakness, the critical rate appears to be a random value out of 15 (4-bits), so the possible critical hit range for a gun is 0-15. How this is generated is based on the game's own internal random number generator.
Critical Rate % effectiveness will vary between enemy types: Some are extra vulnerable to critical hits, like Brutes where the chance is 200% higher, some are resistant, like the 1st No.9 Encounter where it is 50% as effective and some are unaffected, like Scorpions. For instance, if the player is using a Mongoose against No.9 during the first encounter, the critical rate will be 3/15, instead of the usual 6/15.
Weapons List
Only weapons with a critical rate greater than 0 will be listed:
| P08, P08 S.Magazine | 5 |
| M93R | 3, Single 1, Burst |
| P229 | 6 |
| Mongoose * | 6 |
| Tonfa Baton | 3 (2nd hit, only) |
| M4A1 Rifle ** (Normal, +1 and +2) | 3, Single 1, Burst |
| M4A1 Bayonet ** | 1, Burst |
| M9 (Attachment) | 3 |
| M4A1 Javelin ** | 1, Burst |
- * The Mongoose appears to have in-game memory value of 3, but tests show this to be 6.
- ** The M4A1 series of guns appears to have 2 sets of attenuation/critical values. One batch gives the basic critical rate at 3/15 and the attenuation of 0.7. The other one has no critical rate and an attenuation rate of 0.6. Only the M4A1 variants with a critical rate are listed above.
Enemy List
The following enemies have a non-standard (as in not 100%) effectiveness with critical hits.
| Bosses | |
| No.9(1st time) | 50% |
| No.9(2nd time) | 0% |
| Proto Generator | 0% with life support on |
| Sea Diver | 200% |
| Beta Generator | 0% with life support on |
| Puppet Stinger | 200% |
| Brahman Core | 200% |
| GOLEMs | |
| Pawn GOLEM | 50% |
| Rook GOLEM | 0%, 50% with damaged backpack |
| Fatties | |
| Brute | 200% |
| Mossback | 200% |
| Slouch | 200% |
| Sucklers | |
| Bone Suckler | 0% |
| Blood Suckler | 0% |
| NMCs | |
| Bat | 0% |
| Beetle | 0% |
| Green Amoeba | 0% |
| Moth | 0% |
| Red Amoeba | 0% |
| Scorpion | 0% |
Spell Damage
Applies to all offensive spells and combat items. Unlike weapons, spells and combat items do not suffer from an attenuation penalty:
The formula for spell damage appears to be:
- FLOOR( FLOOR( FLOOR( Base Damage x Ofuda x Bonus ) x Weakness|Resistance ) x Difficulty )
- FLOOR refers to rounding a fraction down to the nearest value, regardless if the value is .001 or .999
- The spell value is rounded down three times to calculate the final damage.
| Base Damage | The 'literal' base damage of the spell/item that is listed when inspecting its data. |
| Ofuda | When attached to an armor, the spell/item damage increases by 50%. The value for this will be 1 or 1.5 |
| Bonus | The bonus damage range is 0% - 9%, in increments of 1%, meaning that final damage is one of 10 possible values: 1.00, 1.01, 1.02, 1.03, ... 1.09. |
| Weakness/Resistance | Enemies have different levels of tolerance to certain spells. For instance, Brutes take 200% fire damage while Brain Stingers take 50%. Mechanical enemies like Watchers and Derangement Speakers take none. |
| Difficulty | At higher difficulties, the player does less damage.
|
Status Effects
All status effects last for 20 seconds and turn Aya's status bar red. They may be cancelled at any time through the use of Penicillin, Stim or Metabolism (except for Berserker and Silence).
Used
![]() Berserker
Berserker
- Berserker changes a fair bit in how Aya fights.
- While using a weapon, each shot costs 2 HP to fire and does 50% extra damage.
- Only offensive magic is available and costs 2x the usual cost in HP, rather than MP. All spells are temporarily upgraded by one level.
- This effect may also induced by Aya, given it's bonus damage benefits though the use of Eau de Toilette
![]() Blindness
Blindness
- The screen is affected by a strobing darkness and the reticle is disabled, preventing Aya from targeting enemies. This does not prevent Aya from attacking, but the lack of auto-aiming can prevent her from hitting smaller targets. Spells are still aimed in the same fashion.
![]() Confusion
Confusion
- Changes what the directional pad does for the player frequently. Can also cause Aya to lose track of her current target.
![]() Paralysis
Paralysis
- Every few seconds, Aya stops whatever she is trying to do (attack, cast a spell, etc.) and hunches over, as though she is trying to catch her breath. This prevents her from performing any action (including moving).
- Rapidly moving around the analog stick / directional pad can help to shake off the effect more quickly.
![]() Poison
Poison
- Gradually lose HP. The player loses 1 HP every:
- 120 frames (4 seconds) while standing still.
- 60 frames (2 seconds) while walking.
- 20 frames (0.67 seconds) while walking.
![]() Silence
Silence
- Prevents Aya from casting spells.
Timers
Going with a rate of 30 frames per second, Parasite Eve II uses a few timers for certain in-game events. These timers are only active when Aya can be controlled on the screen. Anything else (Game paused, menu opened, spell being picked, vibration on/off, etc.) will halt any and all active timers.
- Water Gate countdown (before it closes again): 40 seconds.
- Ice Bag becomes Bag of Water: 2 minutes.
- Bringing Burner's HP below 35%: 3 minutes.
- Incinerator Countdown: 5 minutes.
Weapon Damage
Applies to all guns, attachments and melee attacks.
The formula for weapon damage is a bit complicated and appears to be:
- FLOOR( FLOOR( FLOOR( Base Damage x Bonus x Attenuation x Critical x Berserker ) x Skull Crystal x Energyshot x Weakness|Resistance ) x Difficulty )
| Base Damage | The 'literal' base damage of the spell/item that is listed when inspecting its data. |
| Bonus | The bonus damage range is 0% - 19%, in increments of 1%, meaning that final damage is one of 20 possible values: 1.00, 1.01, 1.02, 1.03, ... 1.10 ... 1.19. |
| Attenuation | See Attenuation for more details. The value range will be from 0.3 up to 1.2. |
| Critical | See Critical Hits for more details. The value for this will be 1.0 or 4.0. |
| Berserker | If Aya has been inflicted with BERSERKER status, the player will do 50% more damage. The value will be 1.0 or 1.5. |
| Skull Crystal | When attached to an armor, the weapon damage increases by 20%. The value for this will be 1.0 or 1.2 |
| Energyshot | When cast, Aya's base damages increases. Depending on if it is active, the values can be: 1.0, 1.3, 1.4, 1.5 or 1.6 |
| Weakness/Resistance | Enemies have different levels of tolerance to certain ammo. For instance, GOLEMs take 200% damage from R. Slugs while the 1st No.9 Encounter takes 75% from Grenades. |
| Difficulty | At higher difficulties, the player does less damage.
|