Like its predecessor, the items in Parasite Eve II are fairly numerous and most are analogs to items that typically appear in RPGs. Unlike the previous game (and consequently truer to its survival horror theme) there is not any reviving items so the game has to be played more cautious.
These are the more conventional items that Aya will find throughout the game and are very useful, mainly because they restore HP, MP or status conditions.
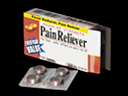
Recovery1[]
Recovery1
Tablet
USE:
ATTACHMENT:
RECOVER 50 HP
RECOVER 45 HP
Description: Multi-vitamin tablet. Heals some HP.
???: A tablet.
Locations: Dropped by enemies, found in various locations, or purchased for 100 BP.
This is one of the weakest Recovery items in the game but is useful early on, when Healing is not cost-effective.
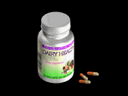
Recovery2[]
Recovery2
USE:
ATTACHMENT:
RECOVER 100 HP
RECOVER 90 HP
Description: Analgesic capsule. Heals HP
Locations: Dropped by enemies, found in various locations, or purchased for 180 BP.
This is a far more powerful version of Recovery1, and is useful when Aya takes nasty hits and Healing is not enough, or you don't want to waste MP.
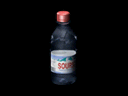
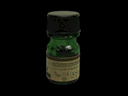
Recovery3[]
Recovery3
Bottle
USE:
ATTACHMENT:
RECOVER FULL HP
RECOVER 150 HP
Description: Nutritive tonic. Heals lots of HP.
???: A medicine bottle.
Locations: Dropped by enemies, found in various locations, or purchased for 350 BP.
This is very useful in the final battles or on harder difficulties, when Aya takes nasty hits from an enemy.
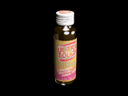
MP Boost1[]
MP Boost1
Plastic Bottle
USE:
ATTACHMENT:
RECOVER 30 MP
RECOVER 25 MP
Description: Spring water. Restores some MP.
???: A bottle filled with water.
Locations: Dropped by enemies, found in various locations, or purchased for 320 BP.
This is very useful for restoring some lost MP from casting spells.
MP Boost2[]
MP Boost2
Bottle
USE:
ATTACHMENT:
RECOVER FULL MP
RECOVER 100 MP
Description: Carbonated mineral water. Restores lots of MP.
???: A bottle filled with water.
Locations: Dropped by enemies, found in various locations, or purchased for 580 BP.
This restores a massive amount of MP, and consequently, it is useful for harder fights or when you are nearly out of MP.
Cola[]
Cola
Can
USE
or ATTACHMENT: RECOVER 80 MP
RECOVER 20 HP
Description: Canned cola. Restores HP and MP.
???: A tasty beverage in a can.
Locations: Found in various locations, or purchased in Replay Mode for 120 BP.
One of the many references of Coca-Cola in Parasite Eve II. Restores a large amount of MP and small amount of HP both in and out of combat.
Penicillin[]
Penicillin
Medkit
ATTACHMENT:
CURE DARKNESS
CURE PARALYSIS
CURE POISON
Description: Anti-bacterial medkit. Cures Darkness, Paralysis, Poison.
???: A multi-purpose medkit.
Locations: Dropped by enemies, found in various locations, or purchased for 80 BP.
This is useful for curing several status ailments, although some armors can help resist these as well, and Metabolism can cure all, making the use of these items limited at best.
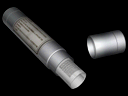
Stim[]
Stim
Ampoule
ATTACHMENT:
CURE SILENCE
CURE BERSERKER
CURE CONFUSION
Description: Restores nerve function. Cures Silence, Berserker, Confusion.
???: Some sort of ampoule.
Locations: Dropped by enemies, found in various locations, or purchased for 80 BP.
This is useful for curing these status ailments, although, much like the Penicillin, Metabolism ultimately makes these items useless.
Protein Capsule[]
Protein Capsule
Capsule
USE
or ATTACHMENT:
ADD MAX.HP +5 HP RECOVER FULL HP
Description: Protein compound medicine capsule. Full HP recovery. Max HP +5.
???: Some sort of capsule.
Locations:
Occasionally dropped or found.
Purchasable for 10000 BP in Replay, Scavenger and Nightmare modes.
This item is useful because not only does it fully restore Aya's HP, but it also permanently raises her maximum HP by 5. This also helps Aya survive in the later areas of the game. On the flipside, the high price this item fetches means it is worth keeping as an endgame bonus (+5,000 BP).
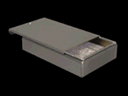
Ringer's Solution[]
Ringer's Solution
Vinyl Pack
USE
or ATTACHMENT:
RECOVER FULL HP
RECOVER FULL MP
Description: Blood substitute. Restores HP and MP to max.
???: A vinyl pack filled with liquid.
Locations: Occasionally dropped or found, or purchased for 200 BP in Replay Mode.
Working as the game's elixir, the Ringer's Solution is a very valuable item and is best saved for the final bosses as it fully recovers Aya's HP and MP. A Ringer's Solution can be won by beating Level 2 of the Shooting Range at M.I.S.T. HQ.
Eau de Toilette[]
Eau de Toilette
Bottle
ATTACHMENT:
INDUCE BERSERKER
Description: Disposable eau de toilette spray. Scent releases latent powers.
???: A small bottle.
Locations: Occasionally dropped by enemy or found. Purchased in Replay Mode for 190 BP.
This inflicts the Berserker status ailment on Aya, which increases the damage done by all attacks. Parasite Energies cost HP instead of MP at twice the cost, and Aya loses 2 HP every time the trigger is pulled (automatic weapons lose less HP). Earth and Water energies cannot be used, but her other powers have their level increased by 1 to the maximum of 3.
Combat Items[]
These are items that are used in combat, either by causing status ailments on enemies or in some cases, preventing them. They need to be typically are attached to Aya's armor in order to function.
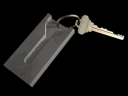
Combat Light[]
Combat Light
Key Chain
ATTACHMENT:
INFLICT DARKNESS
Description: Disposable defense weapon. Blinds enemies in front of you.
???: A light and a key chain in one!
Locations: Dropped by enemies, found in various locations, or bought for 60 BP.
This item is very useful against the Gray and Ivory Stalkers as it causes them to become stunned and makes them visible. Also this can stun most enemies, knocking them over allowing Aya to deal "safe" damage to them. However, the P229 and the MP5A5 have this feature built in and have much more uses for it.
Flare[]
Flare
Small Box
ATTACHMENT:
Base Dmg.:
INFLICT DARKNESS
50
Description: Disposable self-defense weapon. Use to blind surrounding enemies.
???: A small metal box.
Locations: Dropped by enemies, found in various locations, or bought for 150 BP.
Useful for killing weaker enemies, Flares actually deal some damage to the enemies, making them useful against Bats. It does have quite a charge time, but it is useful. The damage is further improved by equipping the Ofuda.
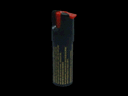
Pepper Spray[]
Pepper Spray
Spray Can
ATTACHMENT:
Base Dmg.:
INFLICT PARALYSIS
5
Description: Disposable self-defense weapon. Use to stun surrounding enemies.
???: A small spray can.
Locations: Dropped by enemies, found in various locations, or purchased for 100 BP.
Since Apobiosis is not available for a large portion of the game, the Pepper Spray is the main way of paralyzing a target (with a much longer paralysis time). Very useful against Brain Stingers and No.9, first encounter. Pepper Spray causes targets to stay in place, allowing Aya to attack with impunity.
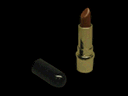
Lipstick[]
Lipstick
Cylinder
ATTACHMENT:
USE:
RESIST SILENCE
ADD MAX.MP +1
Description: Moisturizing lip balm. Attach to prevent Silence.
???: A small metallic cylinder.
Locations:
Won in Shooting Gallery, Level 4.
Found in:
1F Dryfield, Gas Station. Inside Pierce's SUV if you have a key to open it.
Neo Ark, Island
Dropped By (Replay, Normal and Scavanger Modes-only):
1F Dryfield, Toilet, Lesser Stranger x1. Requires Medicine Wheel attached.
Neo Ark, Power Plant 2, Bishop GOLEM. Requires Medicine Wheel attached.
Purchasable in Replay, Scavenger and Nightmare Modes for 5000 BP.
This can be very useful against Rook GOLEMs and Green Amoebas, because they can easily inflict Silence on Aya. While the MP boost is useful, the Silence protection supersedes the minimal MP bonus. The Lipstick can be won by beating Level 4 of the Shooting Range at M.I.S.T HQ; also can be found in Pierce's SUV and on Neo Ark island.
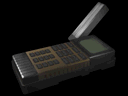
GPS[]
GPS
ATTACHMENT:
MOTION DETECTOR
Description: Military Global Positioning System. Includes a motion detector.
Location: Aya starts the game with this.
This is a very useful item because it allows Aya to see where the enemies are on the map and this can be useful because not all enemies may be on screen.
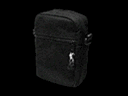
Description: A large belt pack. Increases # of armor attachments.
???: A clip-on pouch.
Locations:
Found In:
B1 MIST Center, MIST Parking (Scavenger Mode-only). Must have purchased a Shoulder Holster before claiming the Level 5 prize from the Shooting Gallery.
B1 MIST Center, MIST Parking. Requires that Aya picked up a Tactical Vest from deceased SWAT member in the Tower.
1F Dryfield, Souvenir Shop
2F Dryfield, Room 5
B1 Shelter, Underground Parking
Dropped By (Replay, Normal and Scavenger Modes-only):
Purchasable for 10000 BP in Replay, Scavenger and Nightmare Modes.
With a maximum of 10 slots per armor, the Belt Pouch allows a single slot to be added, expanding Aya's combat inventory. Since there is a minimal amount of available Belt Pouches, it would be best to save this for your final Armor.
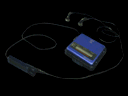
MD Player[]
MD Player
MD Player
ATTACHMENT:
RESIST CONFUSION
RESIST BERSERKER
Description: MD player with "whale songs" disc. Prevents Confusion, Berserker.
???: A portable music player.
Locations:
Found in B6 Shelter, Nursery.
Dropped by Boss Stranger in Tower, Cafeteria with Medicine Wheel attached (Replay and Scavenger Modes)
Dropped by Pawn GOLEM x1, Rook GOLEM x1 in East Mine, Mesa. (Bounty and Nightmare Modes)
Purchasable in Replay Mode for 1000 BP.
This item is very rare as there is only a single one in the normal game. However the fact that it allows Aya to not be Confused or Berserked can be useful as these are relatively critical status ailments.
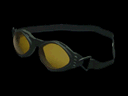
Hunter Goggles[]
Hunter Goggles
Goggles
ATTACHMENT:
RESIST DARKNESS
Description: Special filtered goggles. Attach to prevent blindness.
???: These are colored goggles.
Locations:
Won in Shooting Gallery, Level 3.
Dropped by Knight GOLEM in B1 Dryfield, Underpass (Bounty and Nightmare Modes).
Purchasable in Replay Mode for 1000 BP.
This item is very useful and can be won as a prize by beating Level 3 of the Shooting Range at M.I.S.T. HQ. It makes Aya immune to Darkness, which is very useful as it is a common status ailment and is very annoying to deal with.
Special Items[]
These items are a subgroup of items but are unique in that they buff Aya or they upgrade a PE spell for a specific level.
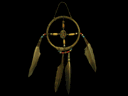
Medicine Wheel[]
Medicine Wheel
Woven Ring
USE:
ATTACHMENT:
??? (Increases one Wind PE level by 1)
??? (Allows Aya to find bonus items after battle)
Description: Native American wall ornament. Attach this and see what happens.
???: These are colored goggles.
Locations:
B3 Shelter, Dumping Hole. Found in a chest after the Glutton battle.
Purchasable in Replay Mode for 27800 BP.
This item is one of several that (pretty much) should be attached to the armor at nearly all times. It allows Aya to find rare and invaluable equipment/items after certain fights when equipped on her current armor to help survive future encounters.
Holy Water[]
Holy Water
Bottle
USE:
ATTACHMENT:
??? (Increases one Water PE level by 1)
??? (Reduces damage taken by 25%)
Description: Small bottle labelled "Holy Water". Attach this and see what happens.
???: A small bottle filled with liquid.
Locations:
2F Dryfield, Loft. Found in a locked chest. The passcode to open it is is 4487.
Purchased in Replay Mode for 5000 BP.
Works like an automatic level of Antibody. Recommended attachment if you have trouble avoiding damage.
Ofuda[]
Ofuda
Charm
USE:
ATTACHMENT:
??? (Increases one Earth PE level by 1)
??? (Increases PE attack and Combat Item damage by 50%)
Description: Charm with Japanese lettering. Attach this and see what happens.
???: There's some Japanese on this.
Locations:
1F Dryfield, Water Tower. Received after saving Pierce and delivering a third Bag of Ice
Purchasable in Replay Mode for 5000 BP.
This item is very useful and worth the hassle of three round trips to the ice vending machine because it makes Aya's spells far more useful against many of the later game enemies.
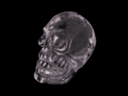
Skull Crystal[]
Skull Crystal
Crystal
USE:
ATTACHMENT:
??? (Increases one Fire PE level by 1)
??? (Increases weapon damage by 20%)
Description: Skull-shaped S. American crystal. Attach this and see what happens.
???: A carved crystal
Locations:
Neo Ark, Submarine Gallery. Found in the pool after defeating Sea Diver.
Purchasable in Replay Mode for 5000 BP.
This item makes the fight against the Sea Diver worthwhile. Despite it being a late-game item, it should be attached to further maximize Aya's damage and survivability.
Purchaseable Spells[]
In Replay Mode, spells that have been leveled up during previous game play may be purchased at all shops. The spell items are represented as color-coded vials (Medkits in the JP version).
Pyrokinesis[]
Pyrokinesis
Level 2 BP Cost: 1250 Description: Fires two burts. Better power and range.
Level 3 BP Cost: 3000 Description: Fires multiple burts. Best power and range.
There is a Level 1 in the game data, but since Aya always starts with Pyrokinesis Lv.1, it remains unused.
Combustion[]
Combustion
Level 1 BP Cost: 750 Description: Immolates enemy.
Level 2 BP Cost: 1750 Description: Immolates enemy. Better power and range.
Level 3 BP Cost: 4000 Description: Immolates enemy. Best power and range.
Inferno[]
Inferno
Level 1 BP Cost: 3000 Description: Generates a small, localized explosion.
Level 2 BP Cost: 4000 Description: Generates a medium, localized explosion.
Level 3 BP Cost: 5000 Description: Generates a large, local area explosion.
Necrosis[]
Necrosis
Level 1 BP Cost: 500 Description: Discharges electricity.
Level 2 BP Cost: 1250 Description: Discharges electricity. Better power and range.
Level 3 BP Cost: 3000 Description: Discharges electricity. Best power and range.
Plasma[]
Plasma
Level 1 BP Cost: 750 Description: Knocks down targets w / a small blast wave.
Level 2 BP Cost: 1750 Description: Smashes down targets w / a small blast wave.
Level 3 BP Cost: 4000 Description: Flattens all targets in the surrounding area.
Apobiosis[]
Apobiosis
Level 1 BP Cost: 3000 Description: Temporarily paralyzes adjacent enemies.
Level 2 BP Cost: 4000 Description: Causes acute seizures in surrounding targets.
Level 3 BP Cost: 5000 Description: Paralyzes all enemies in the surrounding area.
Metabolism[]
Metabolism
Level 1 BP Cost: 500 Description: Restores normal status over time.
Level 2 BP Cost: 1250 Description: Rapidly restores normal status.
Level 3 BP Cost: 3000 Description: Instantly restores normal status.
Healing[]
Healing
Level 1 BP Cost: 750 Description: Heals a little HP.
Level 2 BP Cost: 1750 Description: Heals some HP.
Level 3 BP Cost: 4000 Description: Heals a lot of HP.
Lifedrain[]
Lifedrain
Level 1 BP Cost: 3000 Description: Drains HP from adjacent targets.
Level 2 BP Cost: 4000 Description: Drains HP from nearby targets.
Level 3 BP Cost: 5000 Description: Drains HP from all surrounding targets.
Antibody[]
Antibody
Level 1 BP Cost: 500 Description: Reduces physical damage.
Level 2 BP Cost: 1250 Description: Wards off physical damage.
Level 3 BP Cost: 3000 Description: Greatly reduces physical damage.
Energyshot[]
Energyshot
Level 1 BP Cost: 750 Description: Raises bullets' kinetic energy & penetration.
Level 2 BP Cost: 1750 Description: Raises bullets' kinetic energy & impact.
Level 3 BP Cost: 4000 Description: Raises bullets' kinetic energy & killing power.
Energyball[]
Energyball
Level 1 BP Cost: 3000 Description: Creates a circling orb that repels attacks
Level 2 BP Cost: 4000 Description: Creates 2 circling orbs that repel attacks
Level 3 BP Cost: 5000 Description: Creates a ring of orbs that attack targets.
Key Items[]
These items do not take up Aya's inventory space and are in their own individual slot in the menu.
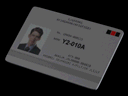
MIST Badge[]
MIST Badge
Description (Menu): MIST ID card. Looks a lot like an FBI badge.
Description (Examine): Badge used for MIST ID. Looks like those used in the FBI.
Location: Default starting item.
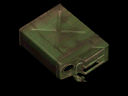
Micro Device[]
Micro Drvice
Metallic Implant
???: Object implanted in NMC's skull.
Description (Menu): Pierce's modified NMC implant. Displays my position on a monitor.
Description (Examine): Implant found in the creature with the ability to mimic human form. The implant was lodged in the brain.
Location: Tower, Cafeteria. 1B Shelter, Pod Service Gantry
Mendel (Sept. Issue)[]
Mendel (Sept. Issue)
Scientific Journal
???: Mendel-- popular science journal.
Description (Menu): This month's feature: Mithocondria. A popular topic these days.
Description (Examine): "Mendel"--science for the masses. Well-known for its coverage of genetics. There's a vocab list for general readers.
This month's features...
"The Human Genome Project"
"Catalogue of Mitochondria"
"Cutting Edge of DNA Therapy"
"The Future of Cloned Organs"
Basic Vocabulary
"Mitochondria"
Organelles found in the cells of most eucaryotic organisms. Mitochondria contain different DNA than that of their host, supporting the theory that mitochondria are relics of separate organisms that joined with the cell nuclei of host organisms soon after life began on this planet.
(An alternate theory, proposed by Dr. Maeda, holds that mitochondria intentionally entered this symbiotic relationship.) Mitochondria are responsible for ATP production, an important source of cell power.
"Genes"
Sections of DNA responsible for determining genetic traits.
"DNA" Deoxyribonucleic acid. The physical gene. These strands carry genetic information on adenine, thymine, guanine and cytosine bases.
"Manhattan Blockade Incident" Popular name for the series of bizarre incidents occuring over the last week of December, 1997 on Manhattan island. These events, including mass immolations and the destruction of police property, ended with a forced evacuation and temporary blockade of the island. Marines brought the situation under control, but not before the toll of the dead and missing rose to 1287 persons. The official report states that a geneticist, Dr. Hans Klaup, was solely responsible for this act of organic terrorism and the creation of the artificial virus that made it possible. Other sources hint a government cover-up. That the N.Y. police detective, Aya Brea, whose heroic actions helped end the incident, was a former patient of Dr. Klaup raised further suspicions in the media.
"Vector" Method of DNA propagation in which a section of DNA is affixed to a virus and sent into the cells of the test subeject. Used to rebuild gene chains.
Location: Tower, Cafeteria.
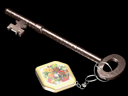
Parthenon Key[]
Parthenon Key
Cafeteria Key
???: Cafeteria key from SWAT officer.
Description (Menu): It opened the cafeteria.
Description (Examine): An antique key.
Location: Tower, East Elevator Hall
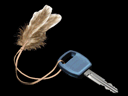
Blue Key[]
Blue Key
Description (Menu): Key on a feather key chain.
Description (Examine): Key with a blue grip.
Location: Tower, Hallway
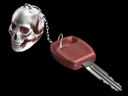
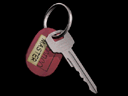
Red Key[]
Red Key
Description (Menu): Key on a skull-shaped key chain
Description (Examine): Key with a red grip.
Location: Tower, Sanctuary
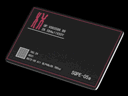
Armory Cardkey[]
Armory Cardkey
Black Card
???: Card dropped by the SWAT imitator.
Description (Menu): Key to the shelter armory. That man stored weapons here.
Description (Examine): Plastic card. The logo resembles two bent Xs lined up next to each other.
Location: Tower, Roof Garden
Worth 10,000 BP at the end of the game. Required to access the locked area in the Armory.
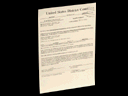
MIST Search Warrant[]
MIST Search Warrant
Description (Menu): Authorizes any search in Dryfield. Includes private property searches.
Description (Examine): Special FBI search warrant. Authorized a broad range of activities in anticipation of MIST emergency procedures.
Location: B1 MIST Center
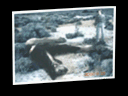
NMC Photo[]
NMC Photo
UMA Photograph
???: Looks a little big for a cougar...
Description (Menu): So this was a picture of an NMC.
Description (Examine): Photograph of an animal corpse over 15' in length. A man holding a shotgun is visible on the right. Out of focus background makes location hard to determine. Appears to be a desert region.
Location: B1 MIST Center
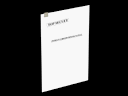
Manual[]
Manual
Description (Menu): MIST civilian disinformation manual.
Description (Examine): The existence of neo-mitochondria is unknown to the public. MIST operations are officially explained as criminal hunts or natural gas explosions. The current investigation is officially a manhunt for a serial killer.
Location: B1 MIST Center
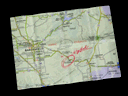
Dryfield Map[]
Dryfield Map
Map
???: Map of Dryfield.
Description (Menu): Map of a part of the Mojave Desert. There's only one town on the road.
Description (Examine): A map of our investigation area in the Mojave Desert. The surrounding is hilly with a number of mesas. With the exception of the town of Dryfield, the area is empty and barren.
Location: B1 MIST Center
This is the item you must examine to proceed with the post-Akropolis Tower cutscene.
Motel Key No. 6[]
Motel Key No. 6
Description (Menu): Motel room key from Mr. Douglas. The tag says "6."
Description (Examine): Key to a guest room in the Bronco Motel. The tag has a big number "6" on it.
Location: 1F Dryfield, Garage
Saloon Key[]
Saloon Key
Key taken from Corpse
???: It's engraved, "G&R."
Description (Menu): Key to "Gene & Roy's" saloon.
Description (Examine): An aluminum key with the engraving "G&R".
Location: 2F Dryfield, Water Tank
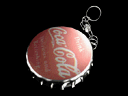
Bottlecap Magnet[]
Bottlecap Magnet
Magnet
???: I used to collect these in school.
Description (Menu): Magnet shaped like a cola cap. The back is magnetized.
Description (Examine): A promotional item in the shape of a cola bottlecap. There's a magnet on the back.
Location: 1F Dryfield, G&R Kitchen
Factory Key[]
Factory Key
Description (Menu): Key to Mr. Douglas's garage. This key is a real antique!
Description (Examine): An iron key. It's covered with rust.
Location: 1F Dryfield, Breezeway
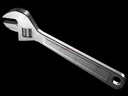
Monkey Wrench[]
Monkey Wrench
Description (Menu): Adjustable wrench.
Description (Examine): An adjustable wrench that fits any size nut or bolt.
Location: 1F Dryfield, Garage
To receive this item, you must first examine the armoire in the Warehouse, speak to Mr. Douglas in the Trailer Coach about it, then go to the Garage to pick up the tool.
Wire Rope[]
Wire Rope
Rope
???: This could be useful.
Description (Menu): A sturdy rope. This should support my weight.
Description (Examine): A rope reinforces with steel wire. It's wrapped around a tire trim.
Location: 1F Dryfield, Junk Yard
Lobby Key[]
Lobby Key
Description (Menu): Lobby key from Mr. Douglas
Description (Examine): An aluminum key. It has a Motel Bronco tag, with a label that says "lobby."
Location: 1F Dryfield, Trailer Coach
Bronco Masterkey[]
Bronco Masterkey
Key found in the Lobby
???: The tage says "Bronco."
Description (Menu): Should open all the motel rooms.
Description (Examine): An aluminum key. It has a Motel Bronco tag, with a label that says "master."
Location: 1F Dryfield, Lobby
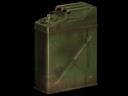
Jerry Can[]
Jerry Can
Description (Menu): It's empty.
Description (Examine): A metal container for carrying gasoline.
Location: 1F Dryfield, Loft
Gasoline[]
Gasoline
Description (Menu): Gasoline (in the gas can). This should get the truck running.
Description (Examine): 2 gallons left.
Location: 1F Dryfield, Gas Station
Truck Key[]
Truck Key
Description (Menu): Truck key from Mr. Douglas. This is my ticket to the shelter.
Description (Examine): A truck key with a tattered leather key chain. It's been well-used.
Location: 1F Dryfield, Main Street
Oak Board[]
Oak Board
Board
???: A sturdy-looking board.
Description (Menu): There are footprints on it.
Description (Examine): An oak board 8' in length. The corners show excessive wear.
Location: East Mine, Forked Tunnel
To pick up you must first examine the damaged rails in West Mine, Gorge.
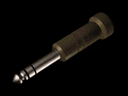
Jumper Plug[]
Jumper Plug
Plug
???: Looks like a headphone jack...
Description (Menu): Electrical switchboard component.
Description (Examine): Plug for a wiring board.
Locations:
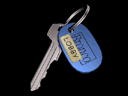
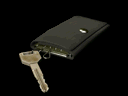
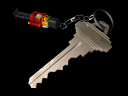
Description (Menu): Key to Pierce's SUV. It's on a cute key chain.
Description (Examine): Key to an SUV. It has a German-made toy key chain.
Location: 2F Dryfield, Water Tank
Earned as a reward for saving Pierce.
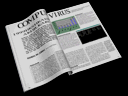
Aeris (Sept. Issue)[]
Aeris (Sept. Issue)
Computer Magazine
???: Aeris-- a computer magazine.
Description (Menu): A magazine about the Internet. Special Issue:"Next-Gen Viruses"
Description (Examine): An Internet magazine. Special issue: "Detecting and Preventing Next-Gen Viruses."
"Next-Gen Viruses"
"The next generation computer virus 'FateKeeper.' This virus is actually a kind of worm that opens a hole in password..protection and automatically..changes the passwords it finds. The worm duplicates itself over email messages, so once an infection is detected it's usually too late.
Fortunately, the worm announces its arrival by displaying an animated caterpillar graphic on the screen, so you know if you've been hit and can move on to damage control.
Once it enters a system, the worm works its insidious brand of magic by rearranging the letters of the passwords it finds in alphabetical order. Letters appearing more than once are displayed with the letter and..the number of times it appears.
For example, the password 'CBABC' would change to 'AB2C2'
To top it off, the worm displays the original password on the screen just to taunt the user. Gee, thanks."
Location: B1 Shelter, Sleeping Quarters
Worth 5,000 BP at the end of the game.
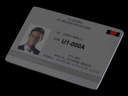
Bowman's Card[]
Bowman's Card
Card
???: A plastic card.
Description (Menu): This belonged to a researcher.
Description (Examine): A magnetic cardkey. It belonged to the Neo Ark lead researcher, Fred Bowman. From the picture, he looks like a nervous, middle-aged man.
Location: B1 Shelter, North Maintenance Hallway
Worth 30,000 BP at the end of the game. Can be picked up even if you have Yoshida's Card.
Yoshida's Card[]
Yoshida's Card
Card
???: A plastic card.
Description (Menu): This belonged to a programmer.
Description (Examine): A magnetic cardkey. It belonged to system programmer Kazrov Yoshida. The picture shows a young looking man wearing glasses.
Location: B2 Shelter , Elevator. Given to Aya by Kyle. Kyle's path, only.
Worth 15,000 BP at the end of the game.
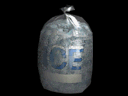
Ice Bag[]
Ice Bag
Description (Menu): Bag filled with ice.
Description (Examine): A bag filled with ice cubes from an ice vending machine.
Location: 1F Dryfield , Main Street. Find it at the ice vending machine after rescuing Pierce.
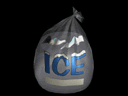
Bag of Water[]
Bag of Water
Description (Menu): All the ice melted. No use for this anymore.
Description (Examine): A bag of water. The ice must have melted.
Location: Anywhere.
Ice Bag turns into Bag of Water after two game minutes.
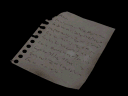
Pierce's Memo[]
Pierce's Memo
Message
???: Something's scribbled on it.
Description (Menu): It's in Pierce's handwriting.
Description (Examine): A torn memo. The message is written in the same code MIST agents use. From the scrawled handwriting, I'd say whoever wrote this was in a hurry
"Aya, All the NMC data you and the other Hunters ever gathered was stored on this facility's mainframe. Looks like they were using the data in their experiments. Someone was leaking MIST data to the people that ran this shelter! Then I found out that Agent Baldwin..." The rest of the memo is missing.
Location: B1 Shelter , Pod Service Gantry. Pierce must survive Dryfield to receive this.
Electric Car Key[]
Electric Car Key
Car Key
???: Looks like a car key...
Description (Menu): Key to the shelter electric car.
Description (Examine): Key with a plastic key chain. The key chain is designed to allow the key to be inserted into a slot.
Location: B1 Shelter, Underground Parking
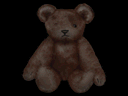
Teddy Bear[]
Teddy Bear
Teddy Bear
???: Hmm... A teddy bear...
Description (Menu): This is Eve's teddy bear.
Description (Examine): A well-loved teddy bear. One of its eyes is missing.
Location: 1F Shelter, Vehicular Airlock
A bear left behind by No. 9 near his motorcycle. It is useful towards the end of the game. You can use it to recruit Flint in helping find Eve. Using the bear this way leads to the Soldier Rescue Bonus.
Worth 10,000 BP at the end of the game.
Mr. Douglas' Letter[]
Mr. Douglas' Letter
Canister
???: Small canister from Flint's neck.
Description (Menu): It's from Mr. Douglas.
Description (Examine): The small tube that hung around Flint's neck. There's a message inside.
"Aya, If you're reading this, you must be okay, thank God. I gave Flint something I thought might be of use to you. Don't worry, I'll put it on your tab. Douglas"
Location: 1F Shelter, Heliport.