(Got the basics up.) |
No edit summary |
||
| Line 222: | Line 222: | ||
Description: ''Semi-auto handgun with special loader.'' |
Description: ''Semi-auto handgun with special loader.'' |
||
<br>???: ''A semi-auto handgun.'' |
<br>???: ''A semi-auto handgun.'' |
||
| − | <br>Location: This can be purchased for 680 BP. It is also dropped in Bounty/Nightmare Modes by a [[Knight GOLEM]] in the Promenade at the [[Akropolis Tower]]. |
+ | <br>Location: This can be purchased from Douglas for 680 BP. It is also dropped in Bounty/Nightmare Modes by a [[Knight GOLEM]] in the Promenade at the [[Akropolis Tower]]. |
<br>Real World Basis: Luger LP08, Long-barreled "Artillery" model |
<br>Real World Basis: Luger LP08, Long-barreled "Artillery" model |
||
|- |
|- |
||
| Line 538: | Line 538: | ||
|colspan=2 style="vertical-align:top;"| |
|colspan=2 style="vertical-align:top;"| |
||
Description: ''M4A1 magazine clip holder. Increases ammo capacity by 30.'' |
Description: ''M4A1 magazine clip holder. Increases ammo capacity by 30.'' |
||
| − | <br>Location: Can be purchased for 1800 BP (2 can be acquired). |
+ | <br>Location: Can be purchased from several stores for 1800 BP (2 can be acquired). |
|- |
|- |
||
|colspan=2 style="padding:2px 16px; background:rgb(0,4,0); text-align:justify; border-top:3px solid rgb(5,10,5); border-bottom:3px solid rgb(16,32,16);"|A clip holder for the M4A1 Rifle, it'll increase the amount of bullets it can hold by allowing it to carry extra magazines. Two can be acquired, with each increasing the M4A1's clip size by 30 extra rounds, up to a maximum of 90. |
|colspan=2 style="padding:2px 16px; background:rgb(0,4,0); text-align:justify; border-top:3px solid rgb(5,10,5); border-bottom:3px solid rgb(16,32,16);"|A clip holder for the M4A1 Rifle, it'll increase the amount of bullets it can hold by allowing it to carry extra magazines. Two can be acquired, with each increasing the M4A1's clip size by 30 extra rounds, up to a maximum of 90. |
||
| Line 561: | Line 561: | ||
|colspan=2 style="vertical-align:top;"| |
|colspan=2 style="vertical-align:top;"| |
||
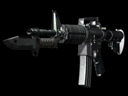
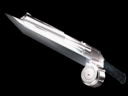
Description: ''Close-combat bayonet. Custom M4A1 attachment.'' |
Description: ''Close-combat bayonet. Custom M4A1 attachment.'' |
||
| − | <br>Location: Can be purchased for 980 BP after arriving in Dryfield. |
+ | <br>Location: Can be purchased from Douglas for 980 BP after arriving in Dryfield. |
|- |
|- |
||
|colspan=2 style="padding:2px 16px; background:rgb(0,4,0); text-align:justify; border-top:3px solid rgb(5,10,5); border-bottom:3px solid rgb(16,32,16);"|This close-combat bayonet is an attachment for the M4A1 Rifle. In hindsight, a very useful addition to your rifle as it deals 70-odd damage (or over 250 for a critical) to all enemies in range and knocks many foes to the floor. Throughout Dryfield, the mine and early shelter you can easily save this weapon's BP cost in ammunition. Much less effective later on when it is generally wise to keep your distance from most ANMCs. It does however make short work of lesser enemies who are prone to swarming Aya. |
|colspan=2 style="padding:2px 16px; background:rgb(0,4,0); text-align:justify; border-top:3px solid rgb(5,10,5); border-bottom:3px solid rgb(16,32,16);"|This close-combat bayonet is an attachment for the M4A1 Rifle. In hindsight, a very useful addition to your rifle as it deals 70-odd damage (or over 250 for a critical) to all enemies in range and knocks many foes to the floor. Throughout Dryfield, the mine and early shelter you can easily save this weapon's BP cost in ammunition. Much less effective later on when it is generally wise to keep your distance from most ANMCs. It does however make short work of lesser enemies who are prone to swarming Aya. |
||
| Line 586: | Line 586: | ||
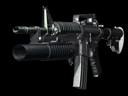
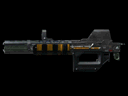
Description: ''40mm grenade launcher. Custom M4A1 attachment.'' |
Description: ''40mm grenade launcher. Custom M4A1 attachment.'' |
||
<br>???: A grenade launcher attachment |
<br>???: A grenade launcher attachment |
||
| − | <br>Location: Can be purchased for 2130 BP. |
+ | <br>Location: Can be purchased from army truck for 2130 BP. |
|- |
|- |
||
|colspan=2 style="padding:2px 16px; background:rgb(0,4,0); text-align:justify; border-top:3px solid rgb(5,10,5); border-bottom:3px solid rgb(16,32,16);"|A 40mm grenade launcher that can be attached to the M4A1 Rifle, Negating the need for the Grenade Pistol at the cost of a higher attenuation penalty. |
|colspan=2 style="padding:2px 16px; background:rgb(0,4,0); text-align:justify; border-top:3px solid rgb(5,10,5); border-bottom:3px solid rgb(16,32,16);"|A 40mm grenade launcher that can be attached to the M4A1 Rifle, Negating the need for the Grenade Pistol at the cost of a higher attenuation penalty. |
||
| Line 609: | Line 609: | ||
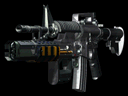
Description: ''High-voltage stun gun. Custom M4A1 attachment.'' |
Description: ''High-voltage stun gun. Custom M4A1 attachment.'' |
||
<br>???: An electric prod. |
<br>???: An electric prod. |
||
| − | <br>Location: Can be purchased for 3720 BP. It is also dropped in Bounty Mode by a [[Knight GOLEM]] in the Parking Area in [[Dryfield]]. |
+ | <br>Location: Can be purchased from BP armory and army truck for 3720 BP. It is also dropped in Bounty Mode by a [[Knight GOLEM]] in the Parking Area in [[Dryfield]]. |
|- |
|- |
||
|colspan=2 style="padding:2px 16px; background:rgb(0,4,0); text-align:justify; border-top:3px solid rgb(5,10,5); border-bottom:3px solid rgb(16,32,16);"|Another attachment for the M4A1 Rifle, a high-voltage stun gun. An essential (to the point of necessity at times) against GOLEM Soldiers as the electricity damages their life support and stuns them from making sudden attacks. |
|colspan=2 style="padding:2px 16px; background:rgb(0,4,0); text-align:justify; border-top:3px solid rgb(5,10,5); border-bottom:3px solid rgb(16,32,16);"|Another attachment for the M4A1 Rifle, a high-voltage stun gun. An essential (to the point of necessity at times) against GOLEM Soldiers as the electricity damages their life support and stuns them from making sudden attacks. |
||
| Line 632: | Line 632: | ||
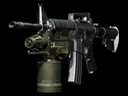
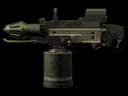
Description: ''Small portable flamethrower. Custom M4A1 attachment.'' |
Description: ''Small portable flamethrower. Custom M4A1 attachment.'' |
||
<br>???: Some sort of ignition device. |
<br>???: Some sort of ignition device. |
||
| − | <br>Location: Can be purchased |
+ | <br>Location: Can be purchased from army truck for 5180 BP. It is also dropped after and if you defeat the Burner and have Medicine Wheel and in Bounty Mode by a [[Knight GOLEM]] in the Shelter Breeding Room. |
|- |
|- |
||
|colspan=2 style="padding:2px 16px; background:rgb(0,4,0); text-align:justify; border-top:3px solid rgb(5,10,5); border-bottom:3px solid rgb(16,32,16);"|Another attachment for the M4A1 Rifle, a small portable flamethrower effective against amoeba NMCs thus saving one's MP for other means. |
|colspan=2 style="padding:2px 16px; background:rgb(0,4,0); text-align:justify; border-top:3px solid rgb(5,10,5); border-bottom:3px solid rgb(16,32,16);"|Another attachment for the M4A1 Rifle, a small portable flamethrower effective against amoeba NMCs thus saving one's MP for other means. |
||
| Line 655: | Line 655: | ||
Description: ''Small laser gun. Custom M4A1 attachment.'' |
Description: ''Small laser gun. Custom M4A1 attachment.'' |
||
<br>???: Some sort of weapon attachment. |
<br>???: Some sort of weapon attachment. |
||
| − | <br>Location: Can be purchased |
+ | <br>Location: Can be purchased from army truck for 7500 BP. Dropped near the end of the game by a [[Rook GOLEM]] in the Shelter B2 South Walkway if Aya has the Medicine Wheel attached. It is also dropped in Bounty & Nightmare Modes by a [[Knight GOLEM]] in the Neo Ark Shrine. |
|- |
|- |
||
|colspan=2 style="padding:2px 16px; background:rgb(0,4,0); text-align:justify; border-top:3px solid rgb(5,10,5); border-bottom:3px solid rgb(16,32,16);"|The final attachment for the M4A1 Rifle, a miniature laser gun that deals good damage against all types of NMCs and with a generous 60 shot capacity, only drawn back by its extended firing period thus leaving Aya vulnerable to harm. Deals roughly 90 damage to any enemy should the laser is kept on the target, moreso with P.E. Energy Shot and can be an effective BP saver as it can be recharged for free. |
|colspan=2 style="padding:2px 16px; background:rgb(0,4,0); text-align:justify; border-top:3px solid rgb(5,10,5); border-bottom:3px solid rgb(16,32,16);"|The final attachment for the M4A1 Rifle, a miniature laser gun that deals good damage against all types of NMCs and with a generous 60 shot capacity, only drawn back by its extended firing period thus leaving Aya vulnerable to harm. Deals roughly 90 damage to any enemy should the laser is kept on the target, moreso with P.E. Energy Shot and can be an effective BP saver as it can be recharged for free. |
||
| Line 805: | Line 805: | ||
|colspan=4 style="vertical-align:top;"| |
|colspan=4 style="vertical-align:top;"| |
||
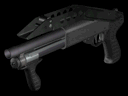
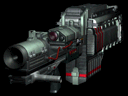
Description: ''Rapid-fire 12-gauge combat shotgun.'' |
Description: ''Rapid-fire 12-gauge combat shotgun.'' |
||
| − | <br>Location: It can be purchased for 12500 BP after solving the full moon puzzle and returning to Dryfield (at lower difficulties). Can be also purchased in Replay mode if '''E ''' rank was achieved in a previous game. |
+ | <br>Location: It can be purchased from Douglas for 12500 BP after solving the full moon puzzle and returning to Dryfield (at lower difficulties). Can be also purchased from the army truck. Can be also purchased in Replay mode if '''E ''' rank was achieved in a previous game. |
<br>Real World Basis: USAS-12 |
<br>Real World Basis: USAS-12 |
||
|- |
|- |
||
| Line 844: | Line 844: | ||
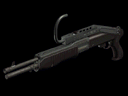
Description: ''Pistol-sized 40mm grenade launcher.'' |
Description: ''Pistol-sized 40mm grenade launcher.'' |
||
<br>???: A grenade launcher. |
<br>???: A grenade launcher. |
||
| − | <br>Location: Aya will find this in the Akropolis Tower (temporary), and it can be purchased |
+ | <br>Location: Aya will find this in the Akropolis Tower (temporary), and it can be purchased from Douglas, BP armory and army truck for 1680 BP. |
<br>Real World Basis: Heckler & Koch HK69A1 |
<br>Real World Basis: Heckler & Koch HK69A1 |
||
|- |
|- |
||
Revision as of 21:53, 10 May 2019
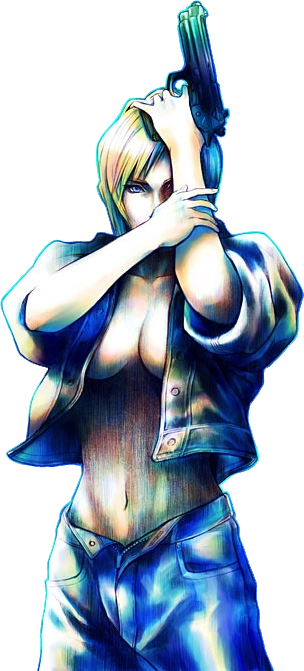
Aya Brea with a handgun.
Parasite Eve II makes more use of long-ranged weapons instead of close-ranged weapons when fighting NMCs. The weapons also effect Aya's agility, ability to dodge, strength, and defense. The heavier the items she's carrying, the slower she'll be while smaller ones allow her to run faster and hold more things. The game lets the player customize some of their equipment.
The range mechanic affects the optimal damage output of any given weapon; the closer Aya is positioned to an enemy often maximizes each gun's damage per shot. This is most apparent in the shotgun line of weapon.
Regular Weapons
These weapons, whether by playing or finishing optional side-quests, are the easier ones to get.
Tonfa Baton
|
Weight:
|
68
|
Critical Rate:
|
3/15 (2nd Hit)
|
|
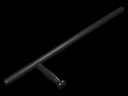
Description: Baton based on an Okinawan design. Masters can attack continuously.
| ||||
| The only strictly melee weapon in the game, it has no need for ammo or P. Energy. The tonfa baton can be used again and again to strike close ranged enemies, it also stuns small to medium NMC, allowing you to keep hitting the enemy until they die. It is useless in distance and against most flying enemies, due to its low attack it is rendered useless after Dryfield since most enemies are fast or HP-tanks like mossbacks and GOLEMs. | ||||
M93R
|
Weight:
|
117
|
Critical Rate:
|
3/15 (Single)
|
|
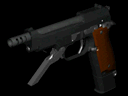
Description: Semi-auto 9mm, fires three-round bursts.
| ||||
| Fast rate of fire, reload speed and good ammo capacity, the M93R handgun is a well-rounded handgun that can easily dispatch small to medium-sized NMC with ease; anything larger would require a heavy amount of ammunition. It has two main firing options, a three-point-burst and a single shot mode. Despite lacking in optimum range, true critical hit power and fully automatic capability, it also lacks the weaknesses alternative handguns have, making it quite versatile. With proper skill and the right ammunition, it is capable of tackling large enemies such as: The Burner, The Glutton (Garbage Boss) and the Blizzard Chaser on Nightmare mode.
Fun fact: While nearly all the firearms in Parasite Eve II are based on common, real-life ones, Aya's default weapon, the Beretta 93R is quite rare and is considered a premier firearm collector's item, especially in the United States. Only a handful in the US are legally transferable. | ||||
MP5A5
|
Weight:
|
288
|
Critical Rate:
|
N/A
|
|
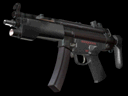
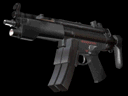
Description: 9mm sub-machine gun. Flashlight attached.
| ||||
| The MP5A5 is the standard firearm of the SWAT teams in Parasite Eve II, the MP5A5 takes 9mm rounds of all types, like any other handgun. Its secondary fire is a flashlight of 50 "shots" capable of inflicting blind (and in a few cases different conditions) on many NMCs. Its high rate of fire is offset by its mediocre range and stopping power. Nevertheless it is a potent weapon should one utilize P.energy shot, essentially transforming it into a mini M249 while maintaining Aya's mobility. A veteran favorite as ammo is abundant with a decent asking price to boot. | ||||
SMG Clip Holder
 |
Weight:
|
+18
|
|
Description: MP5A5 magazine clip holder. Increases ammo capacity by 30.
| ||
| An attachment for the MP5A5; each one increasing the ammo capacity by a nice 30 rounds. Two can be used at once effectively giving it a full 90 rounds. In conjunction with ammo such as the 9mm Spartan and Lv. 3 Energyshot, this attachment maximizes the MP5A5's lethality to near M249. The only downfall from having this attachment on an MP5A5 is that it will rip through your handgun ammo reserve at an extreme speed, with 500 being the most you can carry of a given handgun bullet type up to a total of 1500 bullets only (500 of each: P.B., Hydra and Spartan). | ||
M950
|
Weight:
|
227
|
Critical Rate:
|
N/A
|
|
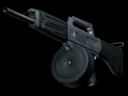
Description: Full-auto 9mm with high ammo capacity.
| ||||
| A full-auto handgun that uses the standard 9mm ammo, it possesses the highest ammo capacity of any handguns in the game. While useful in a few situations, it is not a recommended weapon as its reload time and optimum range is worst out of all handguns in the game. Not recommended for use in Nightmare Mode as it can be sluggish in a tight situation such as the Blizzard Chaser and any Desert Chaser.
The M950 is one of the rare instances in the game where the Real World Basis does not line up with the game's weapon. The Calico M950 is normally a semi-automatic pistol; this weapon was converted to a full automatic (which is possible from a real world standpoint). The drum is the wrong size for 100 rounds; The one used in the game would normally carry 50. | ||||
P08
|
Weight:
|
87
|
Critical Rate:
|
5/15
|
|
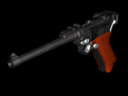
Description: Semi-auto handgun with special loader.
| ||||
| This German semi-automatic handgun can be acquired quite early and gives a good critical rate, but unless you are playing Scavenger or Nightmare mode this gun becomes quickly useless compared to other weaponry due to its mediocre rate of fire. The gun's capacity can be increased via the Snail Magazine; increasing the clip size from seven rounds to thirty-two, furthering its critical rate potential. Most players (in lower difficulty modes) will dismiss this weapon as it holds no real advantage compared to others in the game, often being treated as a challenge weapon above all else.
The Luger LP08 can hold 8 rounds, instead of 7. | ||||
Snail Magazine

 |
Weight:
|
+13
|
|
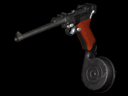
Description: P08 Snail magazine. Increases ammo capacity by 25.
| ||
| A clip holder for the P08 handgun, it will increase the ammo capacity from seven rounds to thirty-two. | ||
P229
|
Weight:
|
92
|
Critical Rate:
|
6/15
|
|
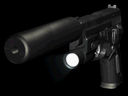
Description: Semi-auto handgun with silencer. Flashlight attached.
| ||||
| A single-shot handgun, this takes all variants of 9mm rounds and has a flashlight for secondary fire. With the highest range out of all handguns and the best critical rate, the P229 is a versatile weapon that is only held back by a moderate rate of fire, lower ammo capacity and its later game availability. Nevertheless, the flashlight is beneficial versus Stalker enemies, making it good competition for the P08 in such fights. Most beginners will dismiss the P229, as many will find it lacking in burst damage. Many advanced players, however, embrace the P229 due to its excellent mobility and in the right hands, holds a good firepower (via critical rate and weakness exploitation) to eliminate enemies patiently from a distance compared to other handguns which requires closer tactics.
The SIG-Sauer P229 (early models) are able to hold 13 9x19mm rounds. | ||||
M4A1 Rifle
|
Weight:
|
254
|
Critical Rate:
|
3/15 (Single)
|
|
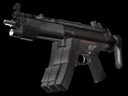
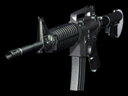
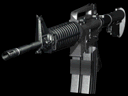
Description: 5.56mm assault rifle. Customizable with attachments.
| ||||
|
Weight:
|
284
|
Critical Rate:
|
1/15 (Burst)
|
| Description: Assault Rifle w / bayonet. | ||||
|
Weight:
|
390
|
Critical Rate:
|
N/A
|
| Description: Assault Rifle w / 40mm grenade launcher. | ||||
|
Weight:
|
339
|
Critical Rate:
|
N/A
|
| Description: Assault Rifle w / 40mm grenade launcher. | ||||
|
Weight:
|
437
|
Critical Rate:
|
N/A
|
| Description: Assault Rifle w / flamethrower. | ||||

|
Weight:
|
488
|
Critical Rate:
|
1/15 (Burst)
|
| Description: Rifle w / laser gun attached. | ||||
| A light and handy small-bore rifle that takes 5.56 cartridges, in general service with USA military units. This rifle packs a good punch and can wipe the floor with small and medium-sized NMC. It also quickly takes care of larger ones and can fire a three-shot burst at the enemy. Unlike other weapons, this rifle comes with the option to attach extra weapons to it and has a variety of customizable options. The M4A1 is often considered the most "well rounded" weapon in the game. This is due to the fact it has decent power, great versatility from its secondary attacks via attachments, and with less than significant penalty to Aya's mobility. A very popular weapon among both beginner and experienced players alike. | ||||
Rifle Clip Holder

 |
Weight:
|
+20
|
|
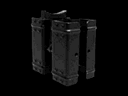
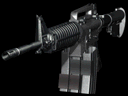
Description: M4A1 magazine clip holder. Increases ammo capacity by 30.
| ||
| A clip holder for the M4A1 Rifle, it'll increase the amount of bullets it can hold by allowing it to carry extra magazines. Two can be acquired, with each increasing the M4A1's clip size by 30 extra rounds, up to a maximum of 90. | ||
M9
 |
Weight:
|
+30
|
|
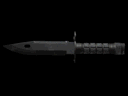
Description: Close-combat bayonet. Custom M4A1 attachment.
| ||
| This close-combat bayonet is an attachment for the M4A1 Rifle. In hindsight, a very useful addition to your rifle as it deals 70-odd damage (or over 250 for a critical) to all enemies in range and knocks many foes to the floor. Throughout Dryfield, the mine and early shelter you can easily save this weapon's BP cost in ammunition. Much less effective later on when it is generally wise to keep your distance from most ANMCs. It does however make short work of lesser enemies who are prone to swarming Aya. | ||
M203
|
Weight:
|
+136
|
|
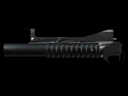
Description: 40mm grenade launcher. Custom M4A1 attachment.
| ||
| A 40mm grenade launcher that can be attached to the M4A1 Rifle, Negating the need for the Grenade Pistol at the cost of a higher attenuation penalty. | ||
Hammer
|
Weight:
|
+85
|
|
Description: High-voltage stun gun. Custom M4A1 attachment.
| ||
| Another attachment for the M4A1 Rifle, a high-voltage stun gun. An essential (to the point of necessity at times) against GOLEM Soldiers as the electricity damages their life support and stuns them from making sudden attacks. | ||
Pyke
|
Weight:
|
+183
|
|
Description: Small portable flamethrower. Custom M4A1 attachment.
| ||
| Another attachment for the M4A1 Rifle, a small portable flamethrower effective against amoeba NMCs thus saving one's MP for other means. | ||
Javelin

|
Weight:
|
+234
|
|
Description: Small laser gun. Custom M4A1 attachment.
| ||
| The final attachment for the M4A1 Rifle, a miniature laser gun that deals good damage against all types of NMCs and with a generous 60 shot capacity, only drawn back by its extended firing period thus leaving Aya vulnerable to harm. Deals roughly 90 damage to any enemy should the laser is kept on the target, moreso with P.E. Energy Shot and can be an effective BP saver as it can be recharged for free. | ||
M249

|
Weight:
|
685
|
Critical Rate:
|
N/A
|
|
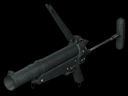
Description: Portable light machine gun. Heavy firepower and a large clip.
| ||||
| A portable light machine gun, this 200-bullet rifle can be used to absolutely destroy enemies if used in conjunction with the P. E. Energy Shot. Its weight and excessive rate of fire (thus ammo depletion) are the only drawbacks from an otherwise absolute must have weapon. | ||||
PA3
|
Weight:
|
270
|
Critical Rate:
|
N/A
|
|
Description: Pump-action 12-gauge shotgun.
| ||||
| A pump-action 12-gauge shotgun. The very first shotgun that a player can procure, having very low clip size, rate of fire and range (unless used in conjunction with the R.Slug Shells). Its only benefits is its area of effect damage per shot with Buckshot, capable of hitting multiple enemies in a single shot thus a circumstantially potent weapon against Moths, Scorpions and Bats (all of which appear frequently until the end of disc 1). | ||||
SP12
|
Weight:
|
420
|
Critical Rate:
|
N/A
|
|
Description: 12-gauge close-combat shotgun. Powerful, but cumbersome.
???: A shotgun.
| ||||
| A high-grade, military pump-action shotgun, like any other shotgun it can take different kinds of shells. This allows good crowd control and can knock back small to medium, and even some large, NMCs at close range. Its potential is offset by its slow reload time and slowest rate of fire among the shotguns. Since you can pick this weapon up for free in the Armory, it will become one of your best friends if you keep all 3 different types of 12-gauge ammo around. | ||||
AS12
|
Weight:
|
559
|
Critical Rate:
|
N/A
|
|
Description: Rapid-fire 12-gauge combat shotgun.
| ||||
| This rapid-fire 12-gauge shotgun has 20 rounds and can tear through any enemy with R. Slug ammo. Be sure to keep the supplies up, else you will run out of ammo relatively quickly. When paired with Firefly shells it will make short work of the watery areas in Neo Ark. Coupled with the P.E. Energy Shot, Aya can put the GOLEMs down in 2-5 shots depending on which GOLEM (with R.Slug ammunition), a must for shotgun fans despite its very high asking price. | ||||
Grenade Pistol
|
Weight:
|
240
|
Critical Rate:
|
N/A
|
|
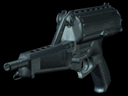
Description: Pistol-sized 40mm grenade launcher.
| ||||
| A pistol-sized 40mm grenade launcher, it is easily one of the most powerful weapons available without any side-quests needing to be completed. If you don't like any of the other M4A1 attachments it is easily replaced by the M203 to conserve inventory space. Its immense burst firepower is offset by its extremely low firerate (second only to the hypervelocity) and its slow reload speed. An easily accessible, very powerful boss-killer weapon. | ||||
MM1
|
Weight:
|
900
|
Critical Rate:
|
N/A
|
|
Description: 40mm launcher with revolving magazine.
| ||||
| This is noted to be the one of the most powerful weapons in the game due to being a twelve-round grenade launcher. A massive improvement over the Grenade Pistol due to its immensely increased capacity. All its destructive potential is offset by its very high price, point of accessibility, extremely slow reload speed and speed penalty (near on-par to that of the hypervelocity). It makes short work of just about any enemy and if paired with Energy Shot it will take most ANMCs out with one to two shots as well as a potent boss-killer. | ||||
Secret Weapons
These weapons can only be obtained by playing in Replay Mode and having earned the Rank to unlock them, which will take quite some time.
Mongoose
|
Weight:
|
168
|
Critical Rate:
|
6/15
|
|
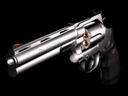
Description: Large 44-calibre revolver. Slow reload, but it's worth it.
| ||||
| A large 44-caliber revolver. Although the .44 Magnum rounds are less powerful than the Maeda SP, it still has good uses. The .44 Maeda SP rounds, received either from Rupert, or brought in Replay Mode, are useful due to the ammo's immediate 'Poison' attribute. While useless against GOLEMs, it works wonders on enemies such as Brain Stingers. The Mongoose has an extremely high critical hit ratio that can match the critical rate of the P229. The maximum damage of this weapon can be over 600, superseding even that of a grenade launcher. With the Maeda rounds used with Level 3 Energyshot, and some luck, this weapon can take down Eve with 25 Shots.
The description calls for the reload to be 'slow', but tests have shown the reload is only slightly behind the M93R and well ahead of most of the heavier weapons. The Mongoose is able to equip and fire the unused | ||||
Hypervelocity
|
Weight:
|
881
|
Critical Rate:
|
N/A
|
|
Description: Magnetic railgun. Fires hyper-sonic rounds.
| ||||
| A Magnetic railgun that uses super-sonic rounds, it is as heavy as the MM1 and usually does 2000+ damage to any enemy which rips most if not all bosses apart with ease. It does not use normal ammunition, instead using a battery that can fire 100 shots before it needs to be recharged (which can be done for free at any of the game's shops). Its blast also has a wide swath, so it can wipe out entire groups of enemies with a single shot. Sadly it has a 5 second charge time before each shot, and its heavy weight will require several seconds for Aya to raise the weapon and line it up with her target, making it poor for close-range fights. A collector favorite as it saves BP for other purposes.
The shape of the Hypervelocity bears a physical similiarity to the [Annihilator 2000] seen in [Beverly Hills Cop III]. | ||||
Gunblade
|
Weight:
|
570
|
Critical Rate:
|
N/A
|
|
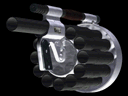
Description: Ultrahigh frequency particle blade. Blade with shotgun attachment.
| ||||
| The hardest weapon in the game to acquire, it was mainly for cross-supporting Square's other game release and is shown quite frequently as it's Golem No.9's primary weapon. Although it is modeled after Squall Leonhart's Revolver gunblade, the model had been redone so that Aya may both attack with it like a sword and shoot it like a shotgun. Deals moderate damage from its melee and shotgun firing modes (with the best range and rate of fire amongst shotguns). Its true potential however, is the combination of both modules. If timed right, Aya can inflict a large amount of damage by swinging the blade and firing a shell just as the blade hits the target. Pulling off the R1+R2 combo with the Gunblade will usually do over 1000 damage to its target, and will cause most ANMCs to literally explode while dealing immense damage to bosses. | ||||